Archive for the ‘Construction Techniques’ Category

Comments Off on Ocarina Making Satisfaction

Ocarina Making Satisfaction


2012
02.15

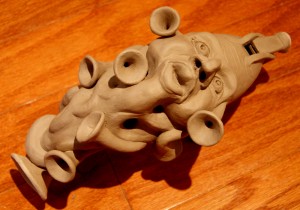
Sculptural OcarinaIt has been a while since I took a day to construct a sculptural ocarina. For those who have not been following along, my sculptural ocarinas are fully functional, single octave ceramic musical instruments plus there is a significantly different, sculptural look to each of them. My earlier face-sculptured ocarinas did not have the detailed facial features of this piece.  For several months I have been studying portrait sculpture and facial anatomy to get a better understanding of how to form facial emotions with some degree of believability.  Even though the face on this ocarina is caricature-like, I would like to believe that the direction is toward believability.

One commenter on my Flickr account noted that this instrument looks either Mayan or Aztec.  That is intentional and may be more evident if I can master the making of custom decals…but that is a post for another day.

Ocarinas with this much ornamentation (approximately 9 separate pieces assembled) brings with it a greater risk that cracking or breakage may happen in the firing process.  The majority of these pieces survive.  Some do not function as well after firing as a ceramic musical instrument due to warpage in the airway and tone-producing fipple area…all the more reason to at least have a surviving sculptural piece that can make a great conversation piece.

I have been asked on several occasions, “Why are these pieces so expensive?”  The total time to form, carve, assemble, tune, fire, glaze, and re-glaze several times can be upward of 20-30 hours. Factor in the cost of materials and energy and what may look like a toy become something of a serious investment.  For me personally, the “AH-HA” moment when a new friend hears the flute-like sound for the first time and inevitably smiles one of those happy, raised-eyebrow smiles makes it all worthwhile.
Comments Off on “M” is for Maquette

“M” is for Maquette


2011
04.06

I have some serious doubts that ancient, mesoamerican musical instrument builders spent time building maquettes of the ceramic musical instruments they created.  Maquette has French, Italian, and Latin genes, originally translated as “speck” or stain”. In contemporary use, it is more commonly used by architects and sculptors to mean a small-scaled, study model for a larger piece. Arguably, ancient Mayan and Incan musical instruments that feature a character holding/playing a much smaller ceramic musical instrument qualifies, I suppose, as a maquette.

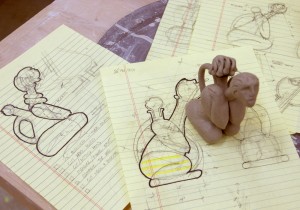
Maquette and Sketches of Whistling VesselFor me, the retired architect, building a maquette for a complex piece that is intended to be both sculptural and functional makes sense. Certainly, sketches are my first step in visualizing what is coming from the mind’s eye and to establish some sense of scale, but there are other benefits. Clay is a very malleable and forgiving media that enables the artist to make mid-course corrections and changes in the designs. Building a small maquette helps to reveal some of those options that might otherwise hide themselves in a two-dimensional drawing.

The maquette and sketches in the picture on this post are for the whistling vessel that is currently under construction. Not wanting to fire the work in multiple pieces, the interior height of the electric kiln became a major factor in the scale of the project. Between the sketching and the constructing of the maquette, a number of changes happened to the original concept as the piece evolved into something that (potentially) will be an unusual whistling vessel. In this instance, the pouring of water through the vessel will play a tone as the water escapes the spout, and, the vessel will play a different tone through the stopper as the vessel is tilted back from a pouring position to its upright state. If it works, I will be thanking that Physics of Fluid Dynamics professor from decades ago. If it doesn’t work, I’ll be blaming the “C-” that I received in the course *grin*.

Comments Off on Experimental Ceramic Drums

Experimental Ceramic Drums


2011
01.13

Experimental UduI would love to give someone else credit for the inspiration of this piece.  I looked at so many images of UdusDoumbeks, and Directional Conga drums.  Somehow, this assembled mixture of parts is the result of numerous sketches and several great ideas from other artists.

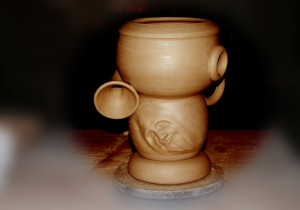
First of all, the stoneware drum is assembled from 6 wheel-thrown parts.  The upper-most portion is designed to accept a stretched, goat skin head that will be secured just below the lower lip of the top opening.  A ring-hole that references the side hole of traditional Udu drums is one of two outlet holes that come into play when the drum head is played…it could also be played, using this hole, like a Udu.

The lower portion of the drum is a closed bowl resting on a permanent ring stand.  This is probably a no-no for the percussion community, but this piece is intended more for display than actual use and I wanted the vertical display to be the only option.

The bell-shaped piece connects to the upper drum-bowl and is a funcional outlet for sound, much like a directional Conga.  The sculpted face has been pushed/altered from the wheel thrown piece to imply a human element attempting to escape the bonds of the ceramic musical instrument.  That aspect may be emphasized at the glazing/staining stage to relate the bell-horn shape with the trapped face.

To provide interest on what might be a plain back to this instrument, two wheel-thrown rings are attached that might function as strap connectors… I am a bit shaky on that thought at the moment but will wait to get a feel of the overall weight and strength of the piece before determining if these rings will provide a function other than decoration.

Four other experimental clay drums are currently drying in hopes that some of these will be ready in time to be featured in the upcoming Alumni Art Exhibit at Belmont University’s Homecoming next month.

Comments Off on Leftover Clay – kiln god

Leftover Clay – kiln god


2010
12.30

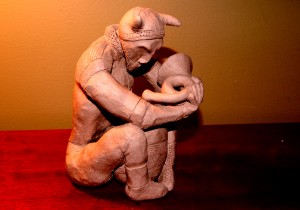
kiln god - Leif the Guardian of MugPhlutes & HornsThis is what happens when there is leftover saggar clay and I’m sitting around over the holidays watching too many movies.  Due to the groggy composition of this particular clay, it isn’t the sort of medium that would find its way into a ceramic musical instrument, so, this lump became my first, stand alone,  kiln god.  And yes, there are similarities to the busts that top the lids of my latest saggar projects (shocking, eh?).

Leif,  Guardian of MugPhlutes and Ceramic Musical Instruments, will take his place above the door of the gas kiln next month after a bisque firing.  The tradition of kiln gods among potters is probably a hold over from an early civilization that believed in animism and polytheistic worship…not so for me, this is just a(nother) touch of whimsy.  Leif began as an anatomically correct Nordic nude wearing nothing but his horned helmet.  Since December has had its snowy-cold days, Leif sprouted some semblance of cover.  We couldn’t have Leif’s parts freezing (or burning) off, now could we!?

Leif’s story?: Prized horns of victory, like the one he clutches here, deserve attention and protection during their construction and firing.  Leif has wrapped himself around a cauldron of fire, passing his spiritual powers on the instrument before placing it into the tempering flames.  (That’s the best I can do on short notice).

Leif stands (or sits in this instance) roughly 8″ in height.  The larger portions of the head, body, and legs are hollowed out. The caldron (urn) between Leif’s legs is a 3″ tall pinch-pot.

Comments Off on Wheel-Thrown Bottles

Wheel-Thrown Bottles


2010
11.03

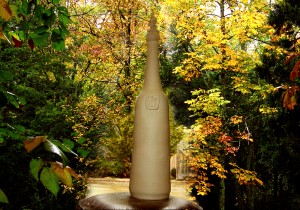
Tall Porcelain BottleGiven the choice between making vases or making bottles, I chose the latter. The decision probably has something to do with a home that is full of great examples created by the real ceramic artist of the family…and something to do with the cool factor of making tall bottles with unusual stoppers. I have no idea what I will do with any survivors from the bisque and gas firings, but I suspect that empty Etsy account may finally have entries just in time for Christmas.

The Pricing Dilemma

Each bottle takes about an hour to throw and join…excluding some drying time between throwing and joining the sections. Add another hour for trimming, decorating, and clean-up and I have a greenware piece ready that must dry slowly. Stoppers generally take another hour to throw, carve, clean-up, and fit. By the time bisque firing and glaze firing are complete, each tall bottle has nearly 5 hours of my time committed to the project in a process that takes about two weeks from start to finish. A quick Google of handmade ceramic bottles returns pricing results that range from $55 to $200, so, somewhere in the $60 to $75 range seems to be a reasonable target. Your thoughts are appreciated.

The Details

Any bottle that I make that is over 12″ tall is thrown on the wheel in two pieces (usually about 8″-10″ each), then joined and completed while still attached to the wheel head. Stoneware clay is my preference, but porcelain makes highly polished bottles possible although they are a bit more challenging to produce. I have not ventured into the world of really tall bottles, made of three joined pieces, but the possibilities for horn shaped pieces constructed using that technique are certainly a possibility (with kiln height limits taken into consideration). I am including the MugPhlute stamp on all of these pieces since they do include a unique stopper with an instrumental musical theme.

Glaze images coming soon (I hope).

Comments Off on First Pots – Let the Wheel Throwing Adventure Begin (Again)

First Pots – Let the Wheel Throwing Adventure Begin (Again)


2010
09.04

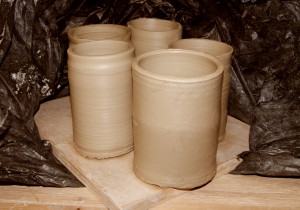
Stoneware - Test CylindersAfter a couple of hours or working on a potter’s wheel for the first time in years, my body reminded me of several parts that are ill-prepared to do this without practice and attention to form (mine, not the pots…well, maybe the pots too).  As a mental break from writing and research, signing up for a clay class looks to be one of the better decisions I have made.  It is fun. The class is full of students plus an great instructor, all young enough to be my children.  I have had more than a few curious looks from my fellow students as I played in the mud the first session or two.

I do have a few ulterior motives.  There are things that a skilled potter can do on the wheel that would make great pieces/parts for ceramic musical instruments…and some of my older sketchbooks attest to the fact that those ideas have been fermenting for some time in the back of my head.  The class also provides me access to a great gas kiln to do reduction firing…a method that produces great color in glazes and from the clay bodies alone.

These practice cylinders are my first.  I suspect that they will end up in the slop bucket, but the picture is a reminder of my first steps back into the (wonderfully addictive) world of wheel-thrown ceramics.

Comments Off on Four Hole Ocarina Magic

Four Hole Ocarina Magic


2010
07.16

I am not sure why I decided to do this. It may be simply the challenge to make an ocarina that plays a full octave with only four finger holes. Perhaps it is the frustration of carving out 8 to 12 holes and constantly fighting the airway in order to achieve a reasonable tone. Regardless, John Taylor’s English system for a 4 hole ocarina is the challenge I made for myself while taking some time off from the craziness of the office:

It will be a while before I am confident that I can play using this system. The permutations and combinations of fingering is quite an adjustment from what I learned as a second grader playing a song flute in one of dad’s music classes. There are a few tricks and tips that I need to pry from some of my ocarina building friends, but I am thrilled to better understand the magic of how 4 finger holes in a simple clay instrument can produce a full octave scale.